Saturday, December 29, 2007

Heater & Windshield Wipers

Today we installed the heater, ran the coolant lines, vacuum lines, wiring and heater ducting. We cut a hole in the dash for the heater core/blower motor to pass through..


Now we need to mount the ECU somewhere else. It will probably end up at the top of the passenger foot well.

Next we installed the wiper assembly. The motor is mounted below..

And the wipers are ready to go on. Once we wire it up and test it Ill put the wipers on and it will be set.

Thursday, December 27, 2007

Mirrors

Today Adam even helped out, by sitting in the car while I installed the mirrors. They're pretty small so you cant see much, but at least its legal to drive this way.


I started the car and ran it for several minutes just to get it warmed up and run some of the new gas through. It sounds great with the side pipes and runs very smooth. I also took measurements to confirm the heater will be able to still fit in the car. It should be pretty straight forward, I'll just need to move the ecu and a few wiring harnesses. Once that's in, we can do the windshield wipers, gauges and dash. Im waiting to install the carpet until some of these things are done so I dont get shavings from drilling various places all over. Aside from those projects Ill just need to retorque everything at the end.

Wednesday, December 26, 2007

Passenger Seat, Inner Fenders, Visors, Wind Wings & Side Pipes

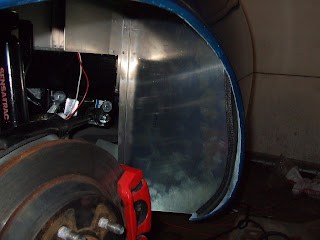
Today I started by installing the passenger seat. Also, I filled the car with gas the other day to find a leak at the filler neck. I figured out a rubber seal on the gas tank was torn and replaced that part today. Next was the inner fenders which go behind the front and rear wheels.

In this picture you can see a plate I installed which covered a hole for a different setup.


While putting the wheels back on I reinstalled the tri-star centers.

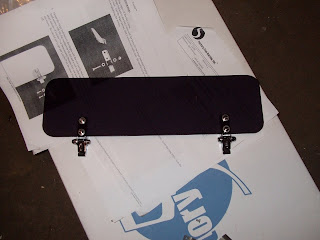
Scott assembled the visors and wind wings and installed them.


Lastly, we put the side pipes back on the car. Polish to Chrome did an excellent job chroming them and the install kit we purchased from Breeze made them actually fit on the car properly.


Friday, December 21, 2007

Radiator Shrouding

As is the way with these things, not all the parts FFR included worked very well so I made one of the pieces.


Thursday, December 20, 2007

Driver Seat Mounted, Buffing Complete

After spending several hours again on the driver seat yesterday I finally managed to modify the mounting plate and brackets to work. The only problem was I couldn't get bolts on the seat once in the car. So today I got some studs from the hardware store and completed the driver seat install.


Unfortunately it still wasn't complete because the seat was against the door.


After more modificiation its now positioned correctly. These seats are very wide and just barely fit in the car.

It can now be adjusted back and forth for the driver. And it doesnt look like much room, but I think someone just over 6 ft tall would still be comfortable in the car.


Next I set up more lighting so Brad could buff the car.


Now it has a mirror shine..


Tuesday, December 18, 2007

Windshield

Scott trimmed the windshield bracket which mounts to the frame. It went on without any real issues other that.


Saturday, December 1, 2007

License Plate Light, Hood/Latches/Hinges, Fuel Cap & Seat

Last weekend Scott wired up the license plate light and mounted the bracket so the car can be street legal (I didn't have a camera last week).


Today, I went to Brad's and picked up the hood. It looks great on the car and everything lines up very well. In addition to mounting it with the hood hinges I installed the lockable hood latches.


Next I installed the fuel cap. It took some modification of the part FFR supplied but after grinding the bottom and changing some of the hardware it works and looks good.


I also made some more progress with the adjustable driver seat. After reading the forums and finding people had basically given up; purchased other aftermarket seat kits, and generally been unhappy with the complexity of the FFR unit and instructions (or lack there of) I decided to figure things out on my own. I took a lot of measurements, cut out a chunk of the seat plate and mounted the seat tracks. As you can see I drilled the outer holes larger to mount the seat straight onto it.


I took measurements of the steel underneath the floor and made a sketch on top to basically figure out where the seat could actually be mounted. Of course rivets make it obvious where certain tubes are as well.
Next time Ill finish mounting the seat. For reference of others building the car I used the 3/4 horizontal bar (thickest line in pic) to mount the rear of the studs. The inner track will be on the round tubing, and the outer track will be about 7 3/4 inches away from that with the rear on the 3/4 bar and front in that bigger triangular area. I'm mounting the seat on that large plate, and the tracks are mounted to it on the bottom. I have spacers on the front so the seat is tilted slightly, otherwise its too vertical and a bit awkward. Lastly I'm going to use the studs which are on the inner track through the round tube. Ill get the nut on by then drilling 2 holes on the bottom of the round tube (from underneath the car) so I can get a socket inside. Of course this will be much more meaningful when its all said and done..