DC was great and after adjusting the suspension, torquing everything down and calibrating the speedometer Ludi is set with the car and very pleased.
In addition to my dads photos, Scott's older brother, Bob, also took some fantastic pictures. There's a whole set here:
http://rjphotography.smugmug.com/
a sample:
Saturday, March 22, 2008
Saturday, March 15, 2008
Cobra Complete, to DC..
Thursday, March 13, 2008
Door Panels, Radio and Speakers Complete
Monday, March 10, 2008
Dash Completed
After weeks and many hours of work we (though Scott deserves most of the credit) finished the dash. It was a pain but it looks awesome!
We also ran the car for about 30 minutes and made sure everything is working properly. We went through all the gauges, lights, switches, wipers, signals, horn, electric fan, bled the power steering and made sure it ran right at operating temp (and a lot of other little things). All thats really left before we leave is the radio (where all the wires are hanging below the dash) which we've pretty much already pre-wired and the door panels.
Saturday, March 8, 2008
dash progress
We finished the wiring to the gauges behind the dash. We wired everything into quick disconnects so the dash could be easily removed all at once. Finally after a few weeks we've finished all this gauge wiring, cutting, drilling and gluing/setting the dash pad to the dash.
A diagram for reference of the quick disconnects (we actually had to figure out on the stock harness where everything came from).
After test fitting the dash and taking measurements we epoxied this bracket to the back of the dash which will help hold it up on the passenger side.
A diagram for reference of the quick disconnects (we actually had to figure out on the stock harness where everything came from).
After test fitting the dash and taking measurements we epoxied this bracket to the back of the dash which will help hold it up on the passenger side.
And finally we started with the gauge cluster which was about 6 inches thick, and removed everything down to this circuit board. We had to keep it because it has a little chip embedded somewhere. Without this, the car wont start.
Next we'll finish the quick disconnects on the car side and finish the dash.
Friday, February 29, 2008
Near Completion Pictures
Saturday, February 23, 2008
Horns, Turn Signal Assembly & Dash
A lot of information for building the car isn't exactly given in the build manual. Sometimes we spend hours just trying to find a wiring diagram or how to make something work on the forums..
Tonight I installed the horns and grounded them, though we still need to figure out which wires are needed for the power through the stock harness.
Then we put the turn signal assembly together. This piece (which is not from FFR) was extremely well designed for the car and looks great. Now the stalk will self cancel like any normal car. We still do need to run the wires for it though.
Then we cut more holes in the under dash panel for the heater and some wiring.
Saturday, February 9, 2008
Ignition, Headlight Switch & Windshield Wipers
Tonight we wired up the key and ignition. It took quite a while to figure out which wires came from where, and what each needed to connect to on the ignition switch. After researching it on the forums we found some seemingly helpful diagrams. Unfortunately, they were incorrect because when the key was switched to the on position, pressing the clutch pedal would engage the starter. After some tests Scott figured it out and we now have the correct; accessories, off, run and starter (engaged by the clutch) positions.
Next, using the headlight switch ordered from FFR, we wired up the parking lights and headlights. Again it took a little time finding the right diagrams, especially because FFR didn't even tell us which terminal is which on the headlight switch, but the switch functions correctly now.
Finally, we wired up with windshield wipers for power and the switch. With this, we were able to attach the wiper arms but then found one of the gears was stripping. After taking it out, Scott discovered the cable wasnt being held tight enough against the gear. So, we used the vice and bent the guide for a tighter fit. After putting it all back together the problem was solved and now the 2 speed wipers work great.
I also finally received the electronic speedometer so hopefully nothing else will hold us up at this point.
Saturday, January 12, 2008
Gauge Wiring, Dash Panel, Misc.
Today we started by first shaping the aluminum dash panel to fit the contours of the dash at each end. After that we test fit it with the under dash panel we purchased by drilling a few holes. We also carpeted the under dash panel.
Next, we did a lot of wiring for the gauges. We made a wiring harness for the back-lighting and each gauges function. Scott added a connector at the end so the entire harness can be disconnected if the dash ever needs to be removed.
Because all the gauges are mechanical we've had to add a few things to the motor which took some time. At the port where the oil filter mounts we took the stock harnesses plug out and put the sending unit for the Autometer gauge. We didn't drain the motor so this was a bit messy. On the driver side behind the motor mount we removed a plug and put the water temp sending unit in. Again we didn't drain the coolant so this made a mess. We found a good place for the oil temp at the bottom port of the oil filter housing but I need to buy a new adapter to mount the sending unit. It looks like the fuel gauge just splices into the stock harness somewhere and the voltmeter is of course the same.
FFR sent us a mechanical speedometer which is incorrect because of the year of our donor, so we need to wait on the new electronic gauge to finish the dash and gauges. We also need to run wires from each sending unit to the dash.
FFR includes a toggle switch for the blinkers so we may order something which mounts on the column. Other than that we figured out a few more things needed and how to mount them.
Wednesday, January 9, 2008
Passenger Seat and Harness
Today I was able to mount the passenger seat. A friend helped weld the top of the bolts to the seat bracket. By doing this I was able to mount the seat to the bracket and just drop everything in place, then put the nuts on from underneath the car. I also mounted the harness and adjusted both driver and passenger harness for a better fit.
Lastly, I bought a piece of carpet to put at the rear of the transmission tunnel and complete the carpeting.
Defrost Vents, Carpet, Driver Seat & Harness
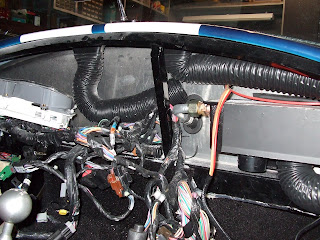
I received the defrost vents and could finish the heater. I cut holes and mounted the tubing and vents.
Next I installed all the interior carpeting except one piece that didn't quite fit right. I was then able to re-install the driver seat, and install the harness.
I also mounted the shift boot.
I'm missing a couple bolts on the passenger side so tomorrow Ill finish the passenger seat and harness installation.
Subscribe to:
Posts (Atom)