Friday, February 29, 2008

Near Completion Pictures

Once the door panels, dash and radio are complete over the next week or two I'll have the final pictures.


It makes me look 7 feet tall..


Saturday, February 23, 2008

Horns, Turn Signal Assembly & Dash

A lot of information for building the car isn't exactly given in the build manual. Sometimes we spend hours just trying to find a wiring diagram or how to make something work on the forums..

Tonight I installed the horns and grounded them, though we still need to figure out which wires are needed for the power through the stock harness.
Then we put the turn signal assembly together. This piece (which is not from FFR) was extremely well designed for the car and looks great. Now the stalk will self cancel like any normal car. We still do need to run the wires for it though.

Then we cut more holes in the under dash panel for the heater and some wiring.


Next we glued the upholstery to the dash.

Then cut all the holes for the gauges, switches, key and lights.

Saturday, February 9, 2008

Ignition, Headlight Switch & Windshield Wipers

Tonight we wired up the key and ignition. It took quite a while to figure out which wires came from where, and what each needed to connect to on the ignition switch. After researching it on the forums we found some seemingly helpful diagrams. Unfortunately, they were incorrect because when the key was switched to the on position, pressing the clutch pedal would engage the starter. After some tests Scott figured it out and we now have the correct; accessories, off, run and starter (engaged by the clutch) positions.

Next, using the headlight switch ordered from FFR, we wired up the parking lights and headlights. Again it took a little time finding the right diagrams, especially because FFR didn't even tell us which terminal is which on the headlight switch, but the switch functions correctly now.

Finally, we wired up with windshield wipers for power and the switch. With this, we were able to attach the wiper arms but then found one of the gears was stripping. After taking it out, Scott discovered the cable wasnt being held tight enough against the gear. So, we used the vice and bent the guide for a tighter fit. After putting it all back together the problem was solved and now the 2 speed wipers work great.

I also finally received the electronic speedometer so hopefully nothing else will hold us up at this point.

Saturday, January 12, 2008

Gauge Wiring, Dash Panel, Misc.

Today we started by first shaping the aluminum dash panel to fit the contours of the dash at each end. After that we test fit it with the under dash panel we purchased by drilling a few holes. We also carpeted the under dash panel.
Next, we did a lot of wiring for the gauges. We made a wiring harness for the back-lighting and each gauges function. Scott added a connector at the end so the entire harness can be disconnected if the dash ever needs to be removed.


Because all the gauges are mechanical we've had to add a few things to the motor which took some time. At the port where the oil filter mounts we took the stock harnesses plug out and put the sending unit for the Autometer gauge. We didn't drain the motor so this was a bit messy. On the driver side behind the motor mount we removed a plug and put the water temp sending unit in. Again we didn't drain the coolant so this made a mess. We found a good place for the oil temp at the bottom port of the oil filter housing but I need to buy a new adapter to mount the sending unit. It looks like the fuel gauge just splices into the stock harness somewhere and the voltmeter is of course the same.
FFR sent us a mechanical speedometer which is incorrect because of the year of our donor, so we need to wait on the new electronic gauge to finish the dash and gauges. We also need to run wires from each sending unit to the dash.
FFR includes a toggle switch for the blinkers so we may order something which mounts on the column. Other than that we figured out a few more things needed and how to mount them.

Wednesday, January 9, 2008

Passenger Seat and Harness

Today I was able to mount the passenger seat. A friend helped weld the top of the bolts to the seat bracket. By doing this I was able to mount the seat to the bracket and just drop everything in place, then put the nuts on from underneath the car. I also mounted the harness and adjusted both driver and passenger harness for a better fit.


Lastly, I bought a piece of carpet to put at the rear of the transmission tunnel and complete the carpeting.
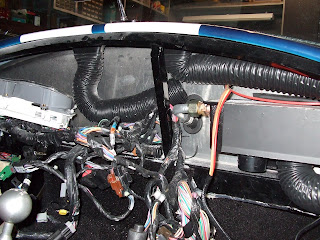
Defrost Vents, Carpet, Driver Seat & Harness

I received the defrost vents and could finish the heater. I cut holes and mounted the tubing and vents.
Next I installed all the interior carpeting except one piece that didn't quite fit right. I was then able to re-install the driver seat, and install the harness.


I also mounted the shift boot.


I'm missing a couple bolts on the passenger side so tomorrow Ill finish the passenger seat and harness installation.

Saturday, December 29, 2007

Heater & Windshield Wipers

Today we installed the heater, ran the coolant lines, vacuum lines, wiring and heater ducting. We cut a hole in the dash for the heater core/blower motor to pass through..


Now we need to mount the ECU somewhere else. It will probably end up at the top of the passenger foot well.

Next we installed the wiper assembly. The motor is mounted below..

And the wipers are ready to go on. Once we wire it up and test it Ill put the wipers on and it will be set.

Thursday, December 27, 2007

Mirrors

Today Adam even helped out, by sitting in the car while I installed the mirrors. They're pretty small so you cant see much, but at least its legal to drive this way.


I started the car and ran it for several minutes just to get it warmed up and run some of the new gas through. It sounds great with the side pipes and runs very smooth. I also took measurements to confirm the heater will be able to still fit in the car. It should be pretty straight forward, I'll just need to move the ecu and a few wiring harnesses. Once that's in, we can do the windshield wipers, gauges and dash. Im waiting to install the carpet until some of these things are done so I dont get shavings from drilling various places all over. Aside from those projects Ill just need to retorque everything at the end.

Wednesday, December 26, 2007

Passenger Seat, Inner Fenders, Visors, Wind Wings & Side Pipes

Today I started by installing the passenger seat. Also, I filled the car with gas the other day to find a leak at the filler neck. I figured out a rubber seal on the gas tank was torn and replaced that part today. Next was the inner fenders which go behind the front and rear wheels.

In this picture you can see a plate I installed which covered a hole for a different setup.


While putting the wheels back on I reinstalled the tri-star centers.

Scott assembled the visors and wind wings and installed them.


Lastly, we put the side pipes back on the car. Polish to Chrome did an excellent job chroming them and the install kit we purchased from Breeze made them actually fit on the car properly.


Friday, December 21, 2007

Radiator Shrouding

As is the way with these things, not all the parts FFR included worked very well so I made one of the pieces.